Outliers Check for temperatures data
To check the outliers for temperatures data, use the menu . It will display a tabbed widget on the left panel, allows to enter the inputs data and parameters.
The tab Data allows to enter the inputs data and set the parameters for the QC.
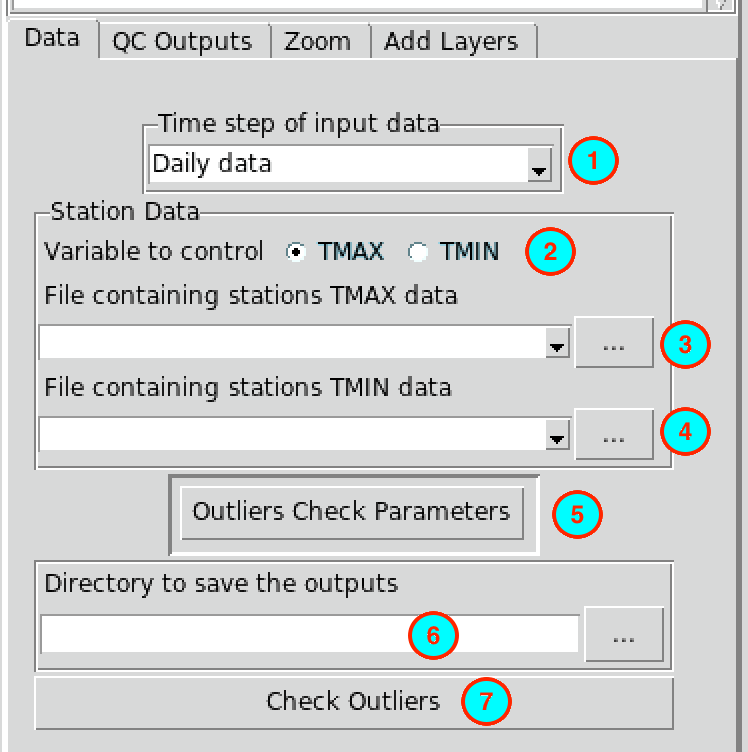
- Select the time step of the station data to be checked.
- Choose the variable to be checked between the maximum and minimum temperature.
- Select from the drop-down list the file containing the station data
to be checked if it is already loaded, or open it from the browse button
 on the right.
- If TMAX is selected in (2), this should be the file containing the maximum temperature.
- If TMIN is selected in (2), this should be the file containing the minimum temperature.
- Select from the drop-down list the file containing the station data
to be used to check if the minimum temperature is greater than the
maximum.
- If TMAX is selected in (2), this should be the file containing the minimum temperature.
- If TMIN is selected in (2), this should be the file containing the maximum temperature.
- Click on this button to set the parameters to perform the outliers check
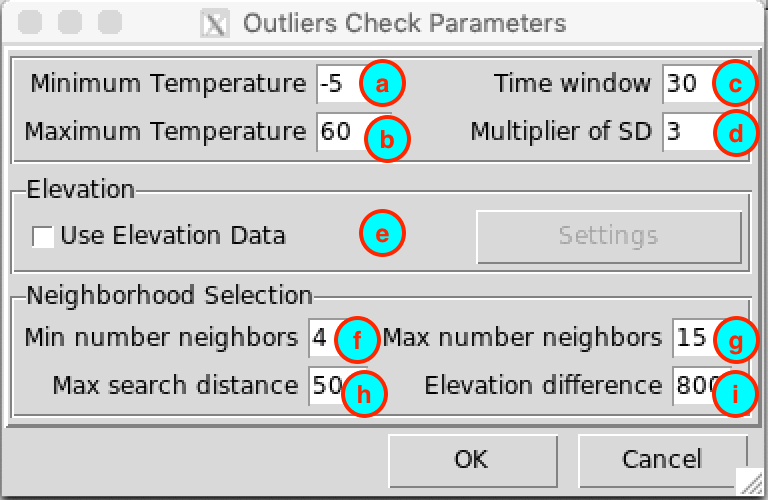
- (a) Specify the minimum possible value of the temperature. It depends on the time step of the input data and the region or country.
- (b) Specify the maximum possible value of the temperature.
- (c) Length of the time window to be used to perform a sliding regression. The unit is days if the input is a daily data.
- (d) Enter the multiplier of the standard deviation to perform the temporal check. You can use a real number like 3.5. In a normal distribution 99.73% of the data should be within +/- 3 times of the standard deviation around the mean. It will be converted to a confidence level to conduct the test.
- (e) If you want to use elevation data to select the neighbor stations, check this box and click on the button , it will display a dialog box which allows to specify the elevation data to be used.
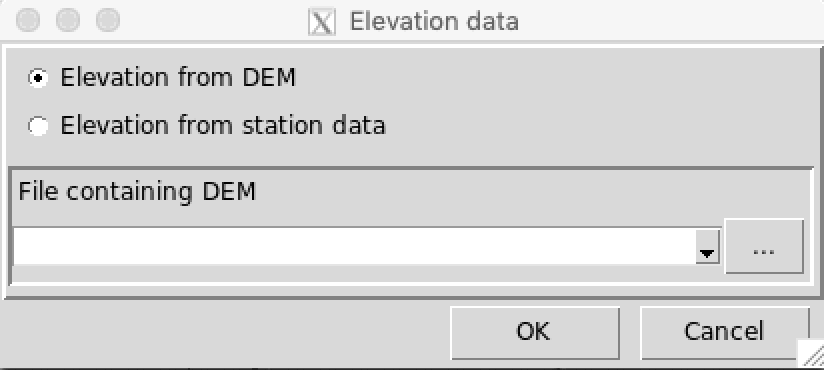
If the elevation data come from DEM (Digital Elevation
Model), Select
 Elevation from DEM , you have
to provide the DEM file in NetCDF format, select it from the drop-down
list if it is already loaded or open it from the browse button . If the elevation data come from
the station data select
Elevation from station data
.
Elevation from DEM , you have
to provide the DEM file in NetCDF format, select it from the drop-down
list if it is already loaded or open it from the browse button . If the elevation data come from
the station data select
Elevation from station data
.
- (f) Specify the minimum number of neighbor stations to be used to form the predictors for the regression.
- (g) Specify the maximum number of neighbor stations to be used to form the predictors for the regression.
- (h) Specify the radius of search (in kilometers) to select the neighbor stations.
- (i) If using elevation data to select the neighbor stations, specify the maximum altitude difference (in meter) to be used to select the neighbor stations. For example, 800 m means the stations located 400 m above and below the target station will be selected.
- Type the full path to the folder to save the results of the outliers
check, or use the browse button .
- Click the button to run the quality control.
This creates a folder named TMAX.OUTLIERS.CHECK_data
or TMIN.OUTLIERS.CHECK_data under the folder you
provided (6) to save the results of the outliers check.
Inside this folder 2 directories and 1 file are created:
- CDTDATASET: directory containing all the required
files used by CDT
- CDTSTATIONS: directory containing the checked data,
when you did a correction on the suspicious values. The name of the file
containing the corrected data is the same as the name of the file from
the input (3).
- OutliersCheck.rds: an index file, you will need to
reload the outputs of QC if you want to view the results or to continue
the correction of suspicious values later.
The tab QC Outputs allows to view the results of the QC.
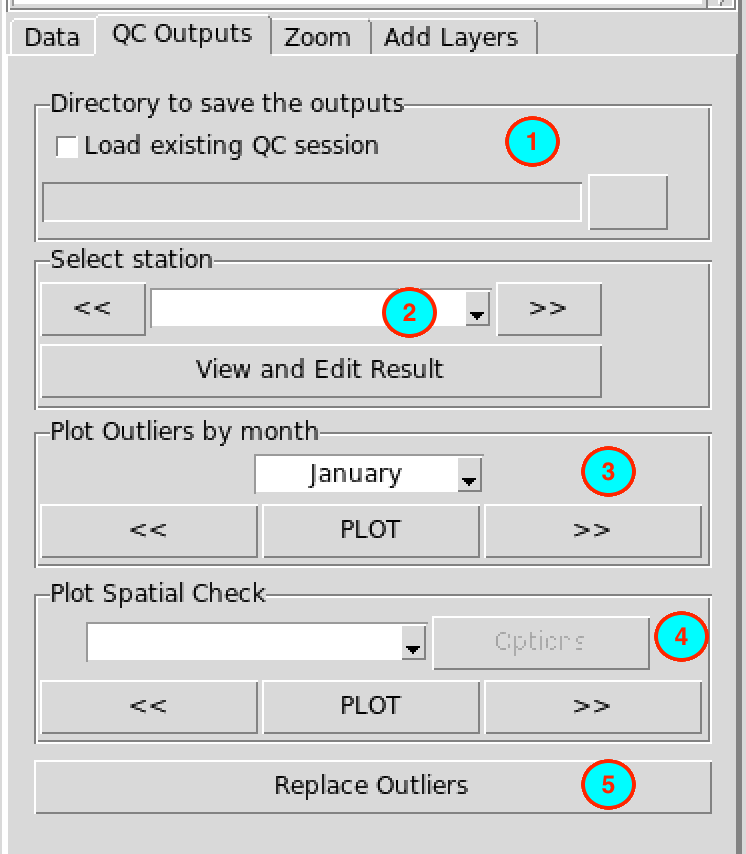
- If you already performed an outliers check, you do not need to run
it again, you can check this box, the input field below will be
activated and you can provide the full path to
OutliersCheck.rds under the folder
TMAX.OUTLIERS.CHECK_data or
TMIN.OUTLIERS.CHECK_data by browsing it through the
button on the
right.
- The stations with suspicious values are listed here. You can select a station and click on the button to view and edit the result of the QC for this station. You can use the buttons or to switch to the previous or next station. It will open a table on the right panel showing the output of the QC for the selected station.
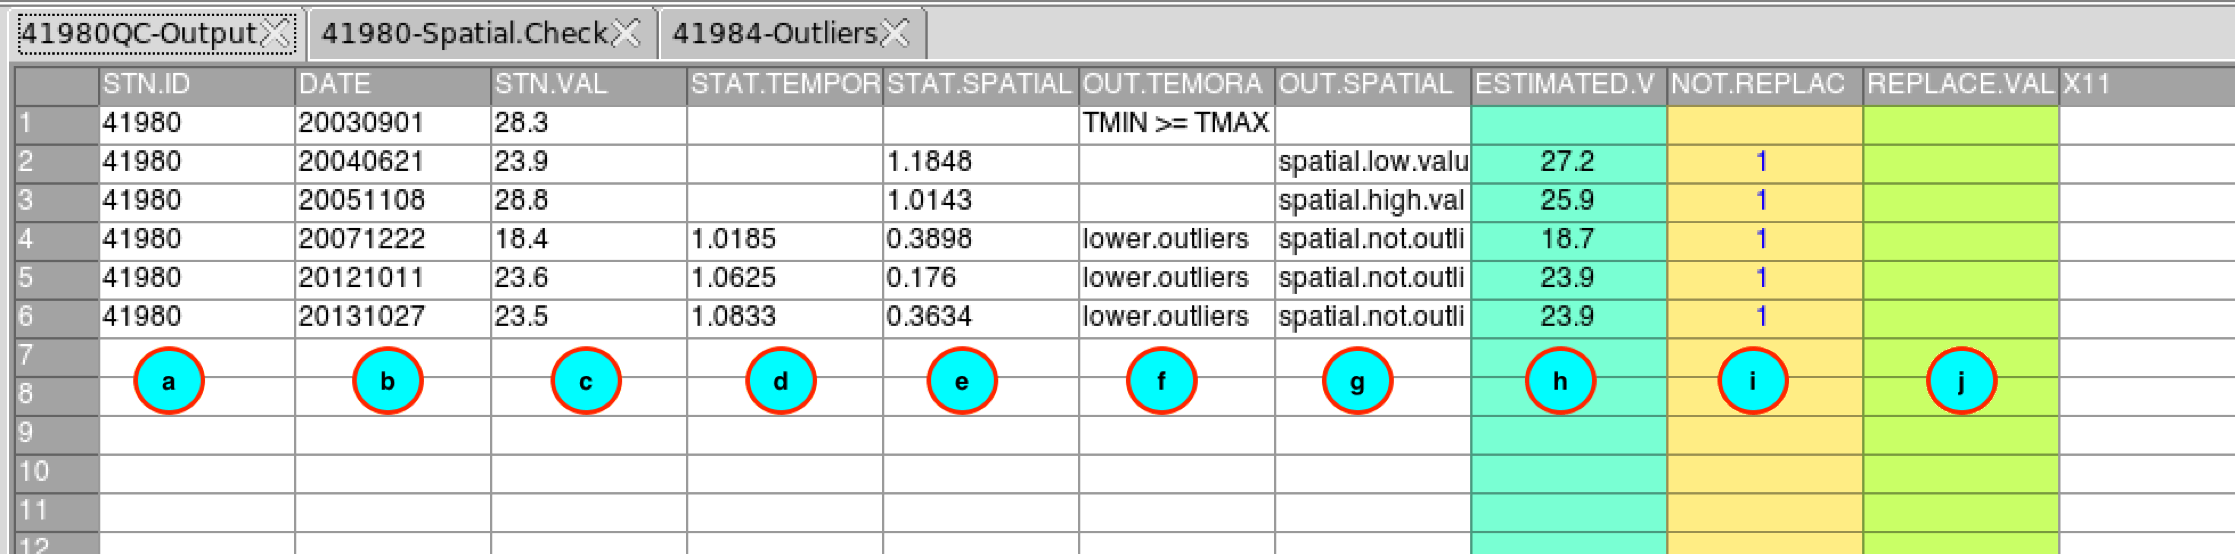
(a) The ID of the station.
(b) The dates on which suspicious values are found.
(c) The observed suspicious values.
(d) Statistics from the temporal check if available.
(e) Statistics from the spatial check if available.
(f) Description of the suspicious value from temporal check.
- lower.values: the value is flagged as too small compared to the time series from this month;
- upper.outliers: the value is flagged as too large compared to the time series from this month;
- TMIN >= TMAX: the minimum temperature is greater than the maximum temperature;
- greater.than.maximum.values: the value is greater than the maximum possible value you provided when you set the parameters of the QC;
- less.than.minimum.values: the value is less than the minimum possible value specified.
(g) Description of the suspicious value from spatial check.
- spatial.not.outliers: the value is flagged as outlier from the temporal check but not an outlier when a spatial check is performed;
- upper.outliers: the value is flagged very high compared to the values of the neighbor stations;
- lower.outliers: the value is flagged very small compared to the values of the neighbor stations.
(h) The estimated value from the regression.
(i) You can specify here an action to take when you want to correct the suspicious value. By default, the value in this column is 1, this means no correction will be done. If you put a flag 1 in this column, the corresponding value in column (c) will be kept. If you put a flag 2, the corresponding value in column (c) will be replaced by the estimated value in column (h). If you leave this column blank, the corresponding value in (c) will be replaced by missing value.
(j) If you put a value in this column, this value will be taken to replace the value in (c). This column takes the priority, whenever you put a flag 1, 2 or leave blank the column (i).
After editing this table, you have to save the changes you made. You
can go to the menu
or click on the button  in the toolbar to
save the table. If the table is saved correctly, you should see an
output message “Table saved successfully”.
in the toolbar to
save the table. If the table is saved correctly, you should see an
output message “Table saved successfully”.
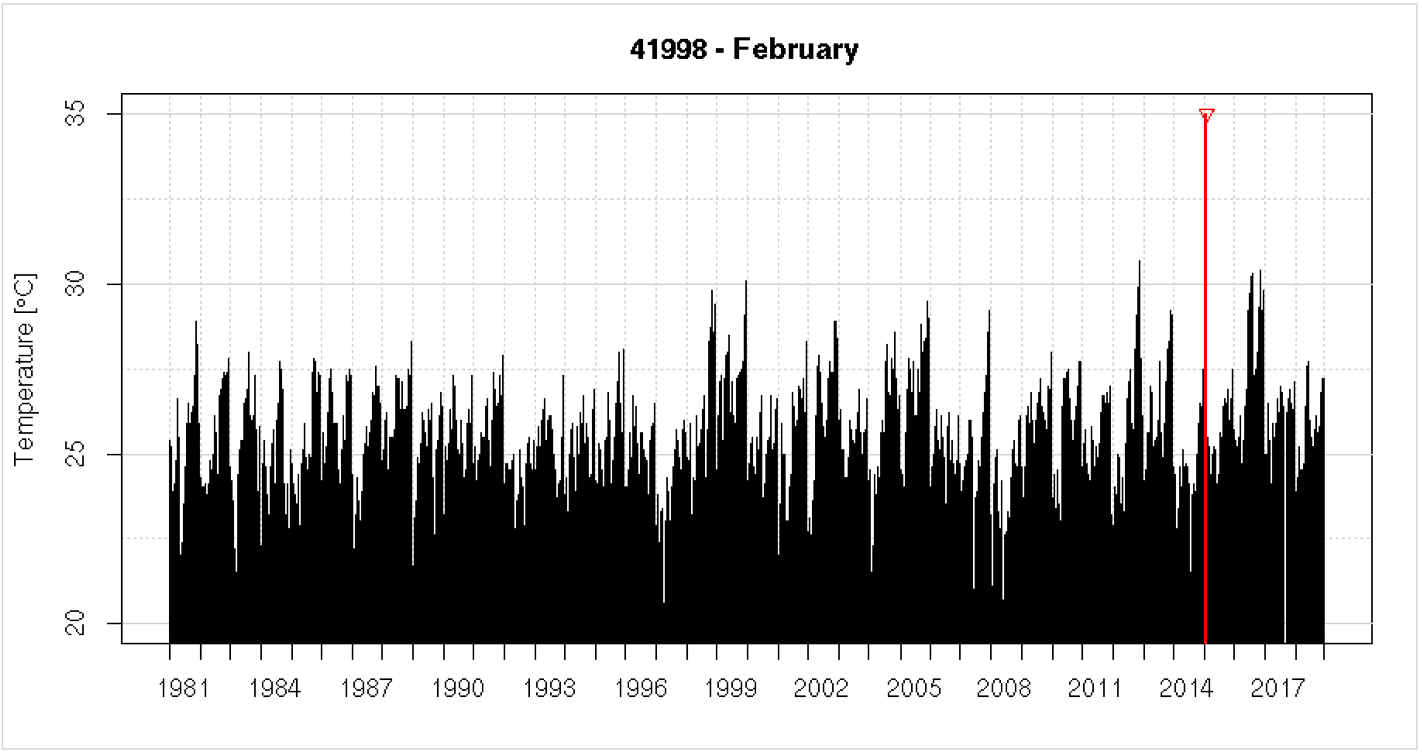
- Select here the month to display a chart of the time series for this month and the suspicious values detected from the temporal check. If you select the month from the drop-down list, click on the button to display the chart. You can use the buttons and to switch to the previous or next month.
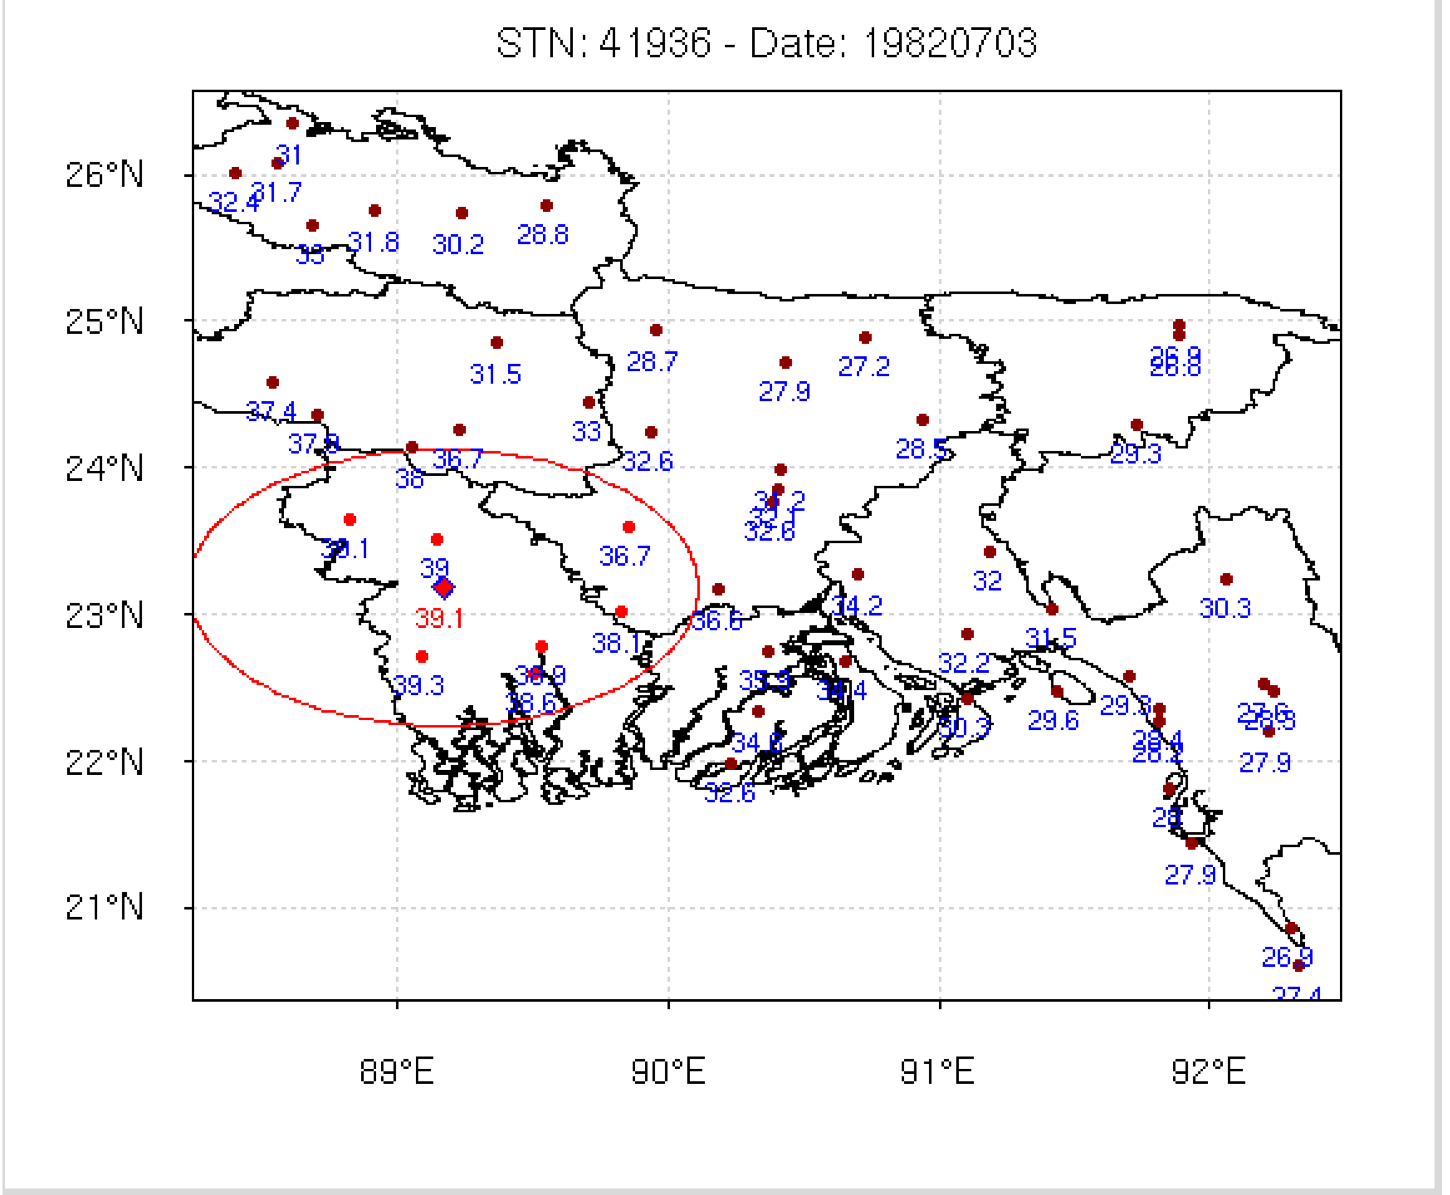
- Select here the date corresponding to a suspicious value to plot it on a map for this date. If you select the date from the drop-down list, click on the button to display the map. You can use the buttons and to switch to the previous or next date.
- After saving the changes you made on the table, click on the button for the changes to take effect.
To replace all the values flagged as suspicious for all stations by
missing values, use the following command to the R
console:
indexQC <- "/<path_to>/TMAX.OUTLIERS.CHECK_data/OutliersCheck.rds"
CDT:::QC.TT_replaceAll(indexQC, action = "all")
Change <path_to> with exact path. The corrected data are located under the folder TMAX.OUTLIERS.CHECK_data/CDTSTATIONS.
You can do the same for the minimum temperature by replacing TMAX by TMIN.
The tab Zoom allows to zoom the displayed map.
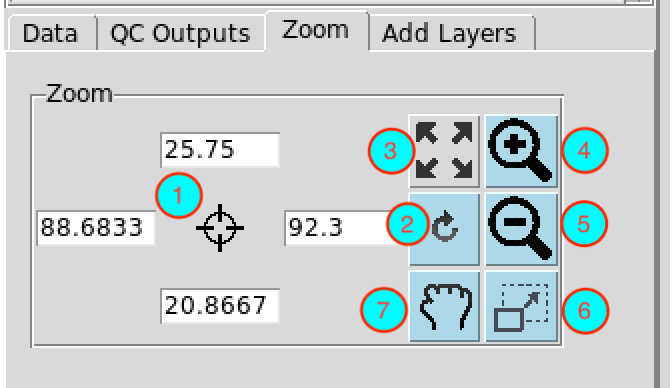
- Enter here the bounding box of the area to be displayed on the map.
- After setting the bounding box (1), click this button for the change to take effect.
- Reset the zoom.
- Zoom in
- Zoom out
- Draw a rectangle on the map to zoom in an area.
- Move the displayed map.
Right click on the map to deactivate the active zoom.
The tab Add Layers allows to superpose other layers.
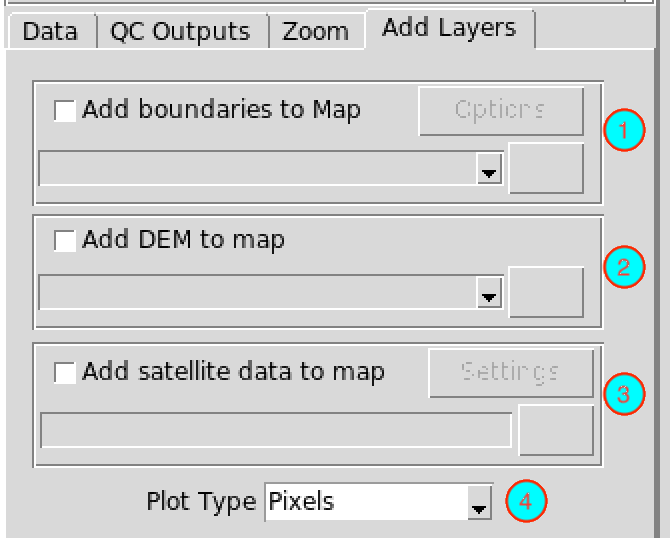
- Check the box and select the shapefile from the drop-down list or
open it from to add
boundaries to the active map.
- Check the box and select the NetCDF file containing the DEM (Digital
Elevation Model) from the drop-down list or open it from to add elevation data as
background to the active map.
- Check the box and enter or browse the full path to the NetCDF data (from satellite or radar) to display. Do not forget to provide a sample file and change the filename format by clicking on the button (see Setting NetCDF data for more details).
- Select the type of the map. You can choose between a pixel-based image or a contour map.