False-Zeros Check for daily rainfall
A false zero is an incorrect report of zero precipitation during the rainy season. The false zeros mainly come from the conversion of file with a given format to another file format, in most cases, the missing values from the original file format are not flagged and left blank, when converting the file to the other format the missing values are replaced by zeros. To check the false zeros, the percentage of zero values for each month at the target station is computed and compared to the average of the percentage of zero values for the corresponding month of the neighbor stations. If this percentage is greater than a given threshold, this month is flagged as a month containing false zeros.
To perform false-zeros check for daily rainfall data, use the menu . It will display a tabbed widget on the left panel, allows to enter the inputs data and parameters.
The tab Data and Parameters allows to enter the inputs data and set the parameters for the QC.
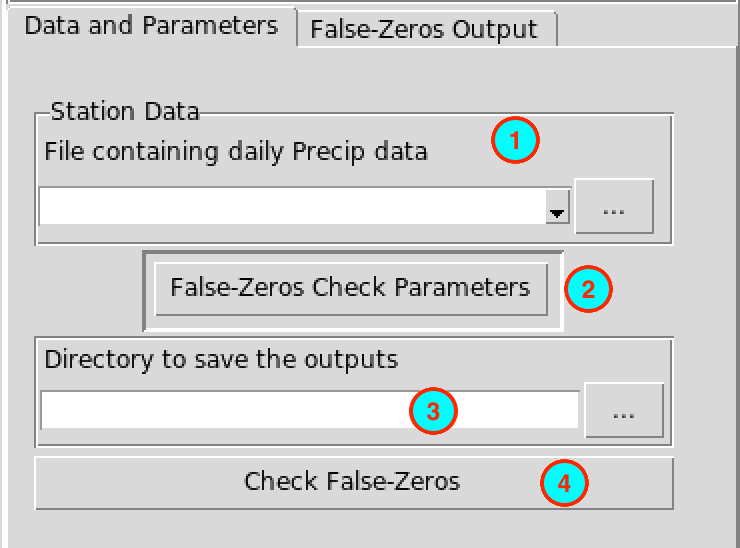
Select from the drop-down list the file containing the daily rainfall station data to be checked if it is already loaded, or open it from the browse button
 on the
right.
on the
right.Click on this button to set the parameters to be used for the false-zeros check. It displays a dialog box
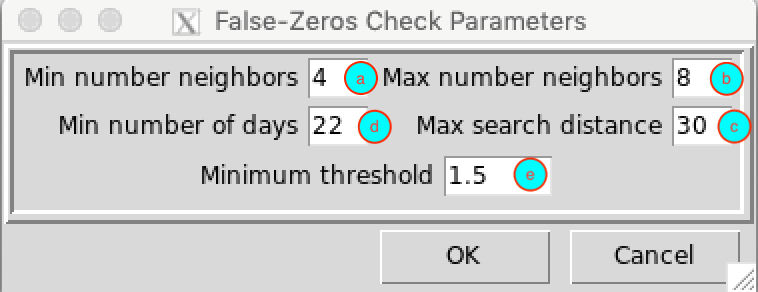
- (a) Specify the minimum number of neighbor stations to be used.
- (b) Specify the maximum number of neighbor stations to be used.
- (c) Specify the radius of search (in kilometers) to select the neighbor stations.
- (d) Specify the minimum number of days without missing values for each month.
- (e) Specify the minimum threshold to be used to flag that a month contains a false zero. If the ratio of the percentage of zero at the target station and the average of the percentage of zero of the neighbor stations is greater than this threshold the corresponding month is flagged as suspicious.
- Specify the folder to save the results by browsing it from the
button or
typing the full path to the folder.
- Click the button to execute.
This creates a folder named FALSE.ZEROS.CHECK_data under the folder you provided (4) to save the results of the false zeros check. Inside this folder 2 directories and 1 file are created:
- CDTDATASET: directory containing all the required files used by CDT.
- CDTSTATIONS: directory containing the checked data, when you did a correction for the flagged months. The name of the file containing the corrected data is the same as the name of the file from the input (1).
- FalseZeros.rds: an index file, you will need to reload the outputs of the false zeros check if you want to view the results or to continue the correction later.
The tab False-Zeros Output allows to view the results of the false zeros check.
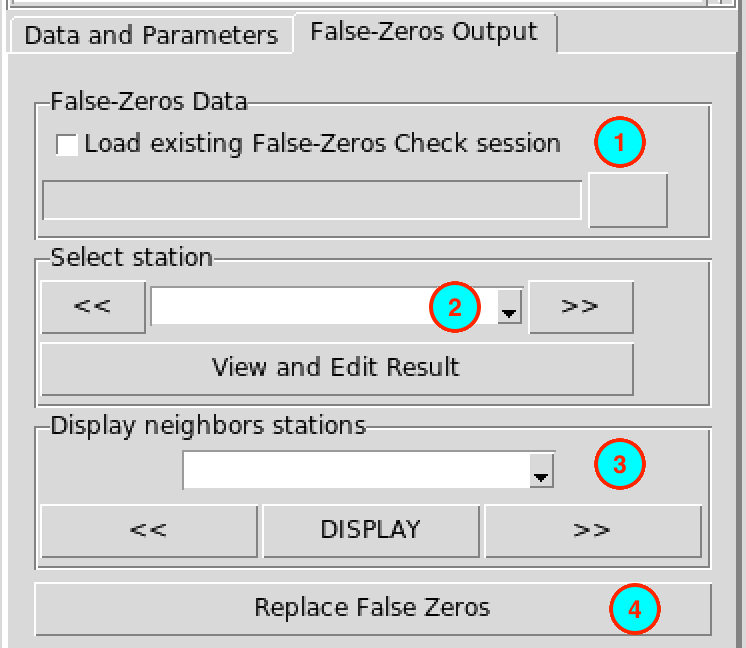
- If you already performed a false zeros check, you do not need to run
it again, you can check this box, the input field below will be
activated and you can provide the full path to
FalseZeros.rds under the folder
FALSE.ZEROS.CHECK_data by browsing it through the
button on the
right.
- The stations with a month containing false zeros are listed here. You can select a station and click on the button to view the results. You can use the buttons or to switch to the previous or next station. It will open a table on the right panel showing the output of the false zeros for the selected station.

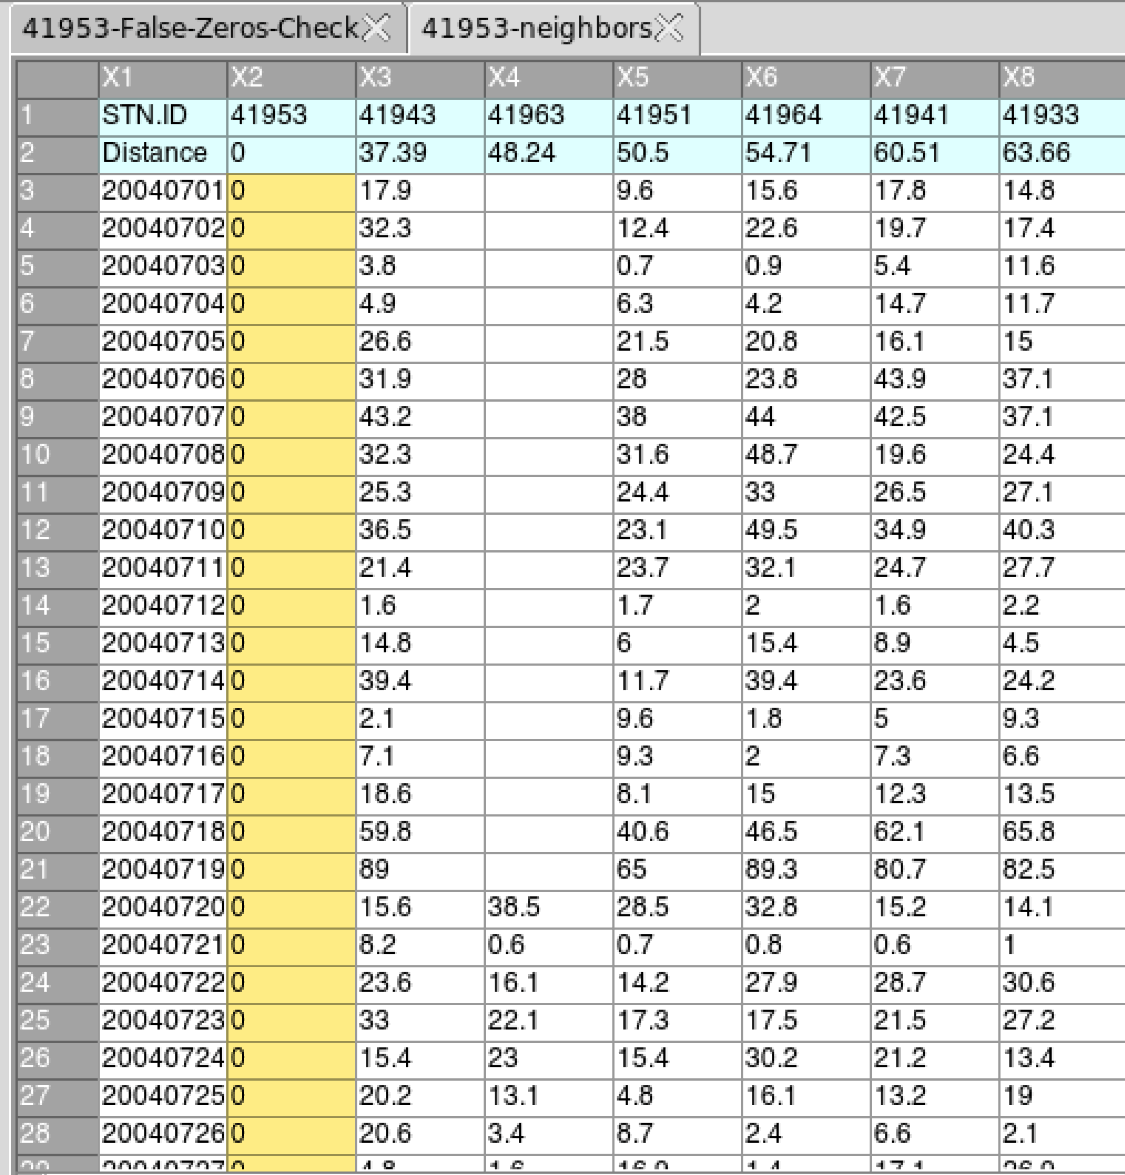
- (a) The ID of the station.
- (b) The months on which false zeros have been suspected.
- (c) The percentage of zero at the target station.
- (d) The percentage of zero for the closest neighbor station.
- (e) The distance in kilometers of the closest neighbor station.
- (f) The average of the percentage of zero for the neighbor stations.
- (g) The maximum value of the percentage of zero for the neighbor stations.
- (h) The ratio of (c) and (f).
- (i) The ratio of (c) and the
interpolated percentage of zero of the neighbor stations using the
method of weighted inverse distance.
After verifying each month flagged as containing false zeros, if you find that the month does not have false zeros, you can remove it from the table by right-clicking on the column of row number corresponding to this month then from the pop menu click on .

After editing this table, you have to save the changes you made. You
can go to the menu
or click on the button  in the toolbar to
save the table. If the table is saved correctly, you should see an
output message “Table saved successfully”.
in the toolbar to
save the table. If the table is saved correctly, you should see an
output message “Table saved successfully”.
- Select here the date corresponding to a month with false zeros to display the values of the rainfall data at the target station and the neighbor stations for this month. If you select the date from the drop-down list, click on the button to display the table. You can use the buttons and to switch to the previous or next date.
- After saving the changes you made on the table (2), click on the button to replace all the false zeros by missing values.
To replace all the values flagged as suspicious for all stations by
missing values, use the following command to the R
console:
indexFZ <- "/<path_to>/FALSE.ZEROS.CHECK_data/FalseZeros.rds"
CDT:::FalseZerosCheck_replaceAll(indexFZ, action = "all")
Change <path_to> with the exact path. The corrected data are located under the folder FALSE.ZEROS.CHECK_data/CDTSTATIONS.