Data Format Conversion
Conversion to CPT data format
If you want to convert CDT station data format or a NetCDF dataset into CPT station or gridded data format, use , it will display a dialog box.
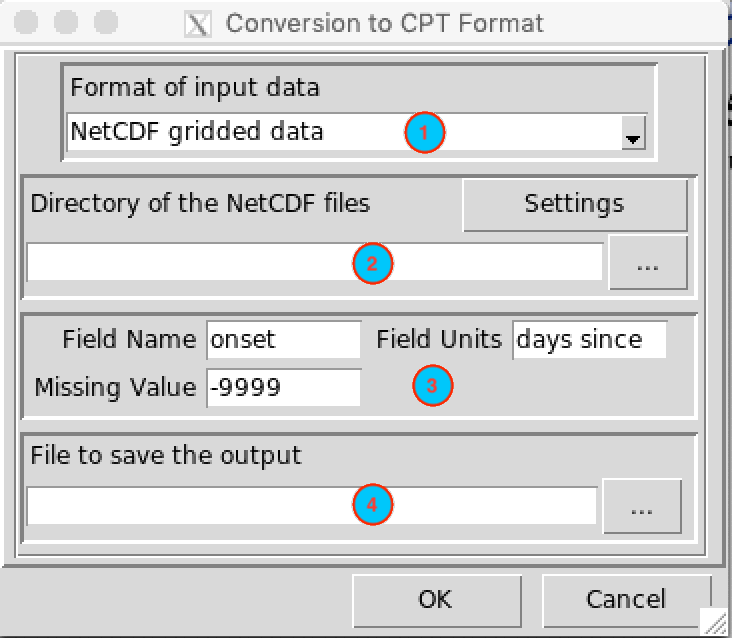
Select the input data format to convert. Available data formats are: CDT stations data format, NetCDF gridded data.
If the input data is a CDT station data format, select from the drop-down list the file containing the station data to be converted if it is already loaded, or open it from the browse button
 on the right. In case of
NetCDF gridded data, type the full path to the folder
containing the NetCDF files or browse it from the button
  on the right. Then click on the
button . A dialog box
will be displayed in which you can provide a sample file and change the
filename format of the NetCDF file.
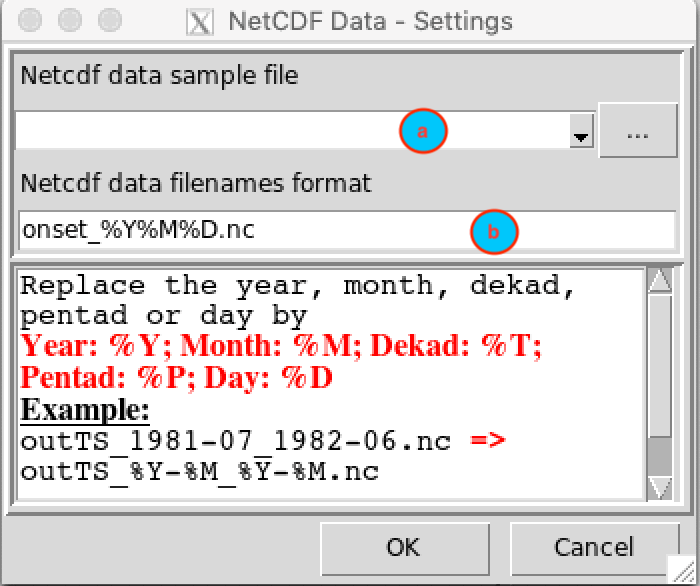
- (a) Provide a NetCDF sample file.
- (b) Change the filename format to conform with the
NetCDF files name. You have to replace the year, month, dekad, pentad or
day in the NetCDF file name as follow
- Year: %Y
- Month: %M
- Dekad: %T
- Pentad: %P
- Day: %D
Example:
If you have a NetCDF dataset with the file name
outTS_2017-12_2018-02.nc, the format should be like
this outTS_%Y-%M_%Y-%M.nc.
If the file name is onset_20181201.nc, the format
should be like this onset_%Y%M%D.nc.
- Specify the CPT tags.
- Field Name: the CPT tag cpt:field representing the abbreviated name of the field variable.
- Field Units: the CPT tag cpt:units for the units in which the data are stored.
- Missing Value: the CPT tag cpt:missing for the missing value code.
- Type the name of the file to save the converted data or the full
path to the file. You can also click on
 on the right, it opens a file
dialog where you can select and/or type the name, the path and the file
extension.
Click on the button  to
start the conversion.
Converting NetCDF/GeoTIFF/ESRI .hdr Labelled
The menu allows to convert NetCDF, GeoTIFF, ESRI .hdr Labelled (.bil and .hdr) files to other format.
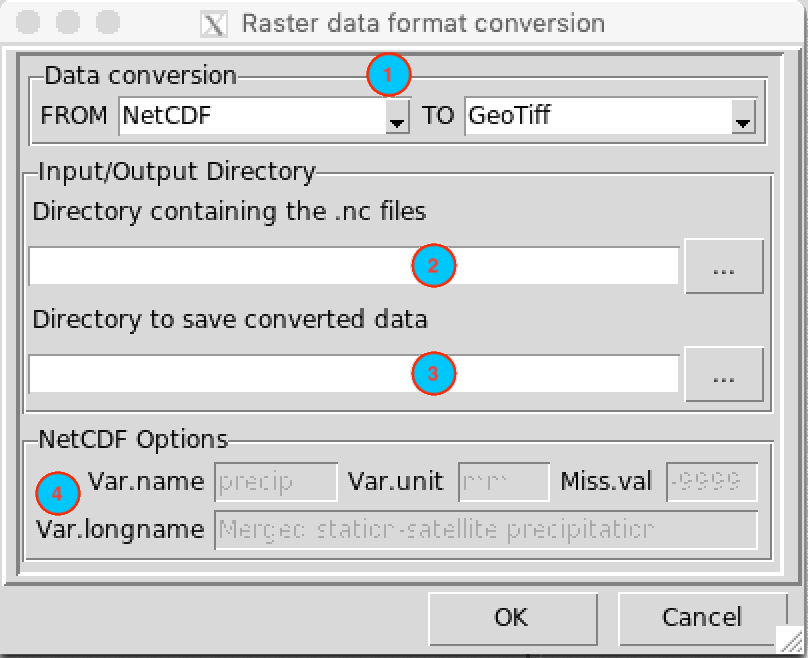
- Select the format of the data to convert and the format in which the data will be converted.
- Type the full path to the folder containing the files to convert or
browse it from the button
 on the
right.
 - Type the full path to the folder to save the converted files or
browse it using the button
 .
. - If the output files are in NetCDF format, all these fields will be
activated allow you to define the NetCDF variable. Take a look at the
function
ncvar_defof theRpackagencdf4for more details.
Click on the button  to
start the conversion.
Create GrADS Descriptor File from CDT NetCDF files
As CDT can only handle a NetCDF data with a separate file for each time step, you need to create a Data Descriptor File to be able to display CDT output NetCDF in GrADS. You can use the menu to create the data descriptor file.
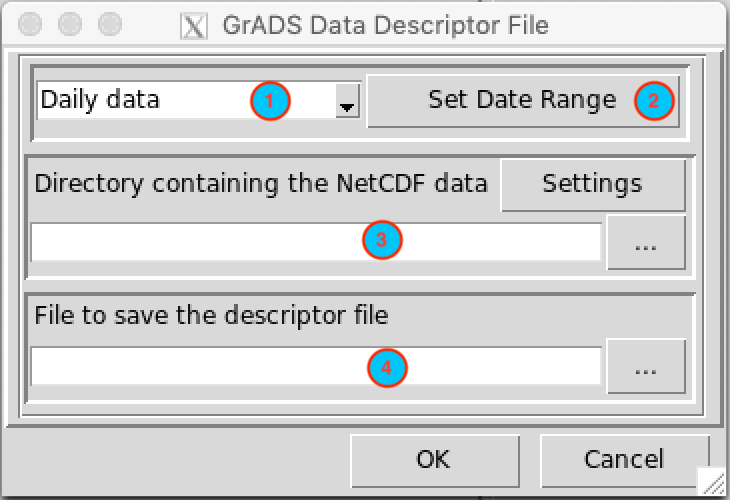
- Select the time step of the NetCDF data.
- Set the date range you want to include to the data descriptor file. See Setting date range for more details.
- Type the full path to the folder containing the NetCDF files or
browse it from the button
 on the
right. Then click on the button . A dialog box will be displayed in which you can provide a
sample file and change the filename format of the NetCDF file.
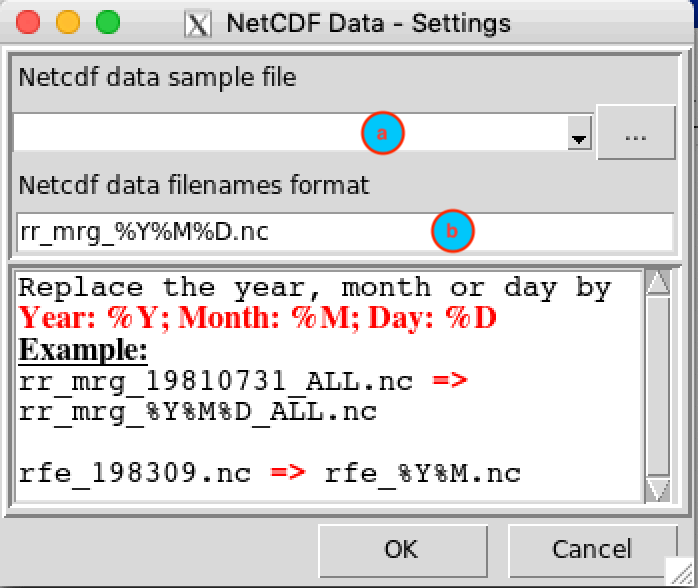
- (a) Provide a NetCDF sample file.
- (b) Change the filename format to conform with the
NetCDF files name. You have to replace the year, month or day in the
NetCDF file name as follow
- Year: %Y
- Month: %M
- Day: %D
Example:
If you have a NetCDF dataset with the file name
rr_mrg_20180121_ALL.nc, the format should be like this
rr_mrg_%Y%M%D_ALL.nc.
If the file name is rfe_201801.nc, the format should be
like this rfe_%Y%M.nc.
- Type the name of the file to save the data descriptor file or the
full path to the file. You can also click on
 on the right, it opens a file
dialog where you can select and/or type the name, the path and the file
extension.
Click on the button  to
create the data descriptor file.